Monday, January 16, 2017

DIY: Wedding Invitations

Wedding invitations were one of my most and least favorite parts of the wedding planning process…all at the same time.  

When I first looked into wedding invitations, I did NOT think, even for a second, that I was going to end making my own. That was until I realized how expensive wedding invitations could get...because companies charge each paper/envelope that you put into it. There aren’t really any “set” deals that I was able to find with decent looking invitations. I was beginning to tell myself that I should probably just take the bullet and expect to spend a bit on the invitations…until my MOH showed me a UK website that sold DIY invitations. Basically, you would just purchase the pieces of the invitation and assemble it yourself. The designs on the website were simple but pretty – basically what I was looking for. I was ecstatic! Then I looked at the price and scoffed! Really?! That much to buy pieces of paper that I would have to print and hand-assemble myself?!

 Psh. I could just design the template myself, print, and cut the invitations instead.

And…that’s what I ended up doing.

I know, I know, you’re probably thinking, “isn’t that a LOT of invitations to make by hand?” …or maybe that’s not what you’re thinking, but that was the first fear I had when I decided to make my own invitations. I was inviting around 125 people and I freaked myself out thinking I needed to hand make 125 invitations. Then I realized that a lot of them are relatives/families, so I didn’t really need 1 invitation per person. In total, for my 125 guests, I made 75 invitations.

**TIP**

Regardless of whether you decide to make or buy your invitations, go into the process knowing how many invitations you’ll need first. This makes the whole process seem less daunting as you’ll actually know how much the cost and efforts will end up being. A lot of websites offer bulking deals…as in the more invitations you order, the cheaper the per unit fee.

The first step to any DIY is to find your motivation/figure out what you want to do. After that, is the execution. Depending on your aesthetics, your invitation inspiration will be different. However, today, I will be sharing with you my process for how I created my wedding invitations.

This was the invitation that inspired me:

Source: 1


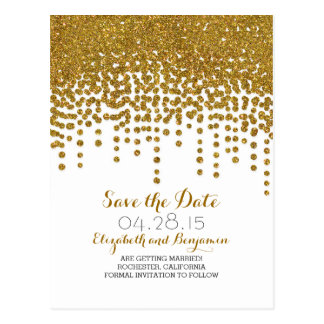
And this was how my completed invitation looked:


Friday, December 16, 2016

Wedding Registries

Time for the fun stuff – the registry!

First off, no you do not need to make a registry. It’s completely up to you! (…As with everything else I’ve mentioned on this blog already haha!) However, where a registry comes in helpful is that it helps provide your guests with ideas on what to get you...so you don't end up with 50 sets of pots and pans!

Let’s start with some of the basics:

What is a Registry?
It’s basically a wish list – it’s where you add things that you would like to receive.

What should I put on my Registry?
Everything and anything you’ve ever wanted. Just kidding. You want to think hard and long about this. Don’t just put everything you think looks nice onto your registry or you might end up spending hours on the back end trying to return things that you really didn’t need.

Some factors to consider when adding things to your list:
  • Is this something that I need right away or can it wait? My husband and I started our registry shortly before we moved into our new place. Prior to moving in together, we both lived at home so we literally had nothing that was ours and had to buy a LOT of stuff ourselves. Our wedding wasn’t until a year later. As a result, we put a lot of stuff we wanted/needed for our new place on the registry…but ended up buying most of it ourselves because we needed the items sooner and couldn’t wait to see if anyone might be getting it for us instead.
  • Do I have room/space for this? Yes, that massage chair or that new pot set would look GREAT in your living room and kitchen, respectively…but do you have room for it? Do you already have things in mind that you can get rid of to make room for this new stuff? If the answer is no, then don’t bother adding it. Piggy backing off of my story from the first bullet, we thought about adding some nice plates to our registry, but we had no room in our cabinets for anymore!
  • Does my registry offer a range of items at different price points? You’ll want to be considerate of your guests, including those who might not be able to afford spending too much on a wedding gift. As such, you’ll want to make sure you add items at different price points to your registry (i.e., low, mid, high, etc.).
  •  Do the items on my registry match the theme of my home? This probably isn’t a high priority for most people, but I like having a cohesive theme at home. As such, when adding items to the registry, I also took into consideration whether they matched the theme of my home and whether they went well with my furniture. I didn’t want things to look random and out of place.

Thursday, June 16, 2016

DIY - Save the Date's

“Save the Date” cards are cards usually sent by the engaged couple to the people they are planning to invite to their wedding. Wait, isn’t that just the invitation? No – actually, “Save the Date’s” are usually meant to be sent in advance of the invitation to give guests a heads up that the invitation will be sent soon. Usually it’s a quick FYI just to let them know when the wedding is happening and who  the individuals involved are.

Now…are they really that necessary? Depends on the size of your wedding and how far away your wedding will be. For example, if you’re planning to have a 2 year long engagement, then it might make sense to send out “Save the Date’s” in advance so your guests will know well in advance and can plan their schedules accordingly. If you’re having a really small wedding, you don’t need to send out “Save the Date’s”—you could just let them know verbally. If your engagement is short, then you totally don’t need this because just the invitation itself should suffice. Really, who am I kidding? You never really need anything. “Save the Date’s” are just nice gestures—not absolutely necessary. If you’re tight on budget, you could just forgo this as well. Honestly, I don’t think anyone would really miss it.

For me, I had a long engagement, so I wanted to send out “Save the Date’s” so my guests would know the date in advance---that and also because I was handmaking all of my invitations and didn’t know when I would be getting them done!

Now, “Save the Date’s” can come in many shapes and forms—feel free to get creative with this. I know some people who’ve done video “Save the Date’s” before, and some people who have done traditional postcards. For me, I wanted to DIY my “Save the Date’s” to keep my costs low and also because I love DIY’ing.

To start the process, I googled and looked on Pinterest for “Save the Date” designs that I liked. Then, I narrowed the selection down to ones that would be easy to make…and then to ones that would be easy to make based on the tools and materials that I would be able to obtain. This last filter made it easy because most of the designs I liked involved color…and I only had a B&W printer. The design I saw was this:

PIC: Source


The design was simple – just find some cream colored stock paper, print out the message, and then go to town with some glitter. Simple enough, right?

Wednesday, June 8, 2016

Saying Yes to the Dress


Wedding dresses stressed me out.

On one hand, I was all like, "it's a once-in-a-life-time (knock on wood) thing--I should get my dream dress even if it costs an arm and leg". On the other hand, I was like "I'm only wearing it ONCE, why am I throwing money at a dress I'm only wearing once and not even for the whole day!"

Can you tell how torn I was about the budget to set for my dress? My co-worker told me that dresses were likely to be at LEAST $1,000 and that they could definitely go for more. However, now that my wedding has passed, I can assure you that gowns range anywhere from $100 to over $10,000.

I originally set my budget at $1,000 but I was really trying to keep it more at the $500 level.

When I first set out to look for my dress, more than 1 person told me that David's Bridal was the worst place ever and to stay away if possible. However, being completely lost and not knowing what I wanted, I decided David's Bridal would be the best place to start given its accessibility and variety of gowns and brands.

Here are some pointers for those of you who are beginning your dress search:
  • Bring your parents -- they're your worst critic (unless you have a girlfriend who could be more brutally honest than your parents)
  • Take pictures in every gown and decide later (tip – if you already know how you want your hair that day, style it accordingly—i.e., if you’re going with an updo, put your hair in a bun, etc.)
  • Try on the dresses with accessories (i.e, sashes/belts, veils, and jewlery)
  • Wear leggings – the dresses you’ll be trying on are dresses that a million other people have tried on before already…wearing leggings made that thought feel less gross to me.
  • Bring your own strapless bra
  • Shoes - they provide you with shoes but if you have a pair of shoes already, might as well wear them to see how it looks and feels with the dress (even though they won't even be visible if you're wearing a long gown...)
  • Make an appointment – seriously, make an appointment. You don’t want to waste anyone’s time by trying to do a walk-in.
  • Don't be afraid to ask the attendants to bring you stuff you’ve already asked for - they forget...a LOT
  • Go more than once – wedding dress shopping will take more than 1 trip to decide.
  • Check online for prices and styles – do your due diligence – just because one store says it’s this price, doesn’t mean it doesn’t go for cheaper elsewhere.
  • Keep a list of dresses you really liked and really want to try – more homework – check out what dresses you definitely want to try on before you go in for your appointment. This helps to save time so you’re not sitting there at your appointment picking out dresses on the spot. Also – this way you can check in advance if the location you’re going to even has the dress you want or if you’ll need to visit a different location.
  • Try a more remote location – I went to both the Manhattan and Long Island City locations for David’s Bridal and let me tell you, Long Island City was a WAY better experience. The store wasn’t crowded with people, which allowed my attendant to pay more attention to my needs instead of having to cater to 10 other people at the same time.

Now, just for full disclosure, I started writing this post before I went on my hiatus. Now that my wedding’s already done and passed, I have additional perspectives on wedding dresses that I’d like to share:

Sunday, June 5, 2016

DIY - Headpieces (Veils & Floral Crowns)


I have to say… one of the most exciting parts of planning my wedding was definitely all the DIY’s I was able to work on. I’ve always loved crafting and DIY’s but never had the motivation to spend any money on materials because they were always just for fun. My wedding, however, gave me the much needed excuse I needed to invest in better quality materials. On top of that, making most of the stuff myself ended up saving me a LOT of money – even though I was buying better quality materials. As such, this post marks the first of many DIY posts to come!

Headpieces can really add a finishing touch to an outfit for weddings—from hair combs, to birds cage veils, to traditional veils, to headbands, and floral crown—the possibilities are endless. These accessories are not exclusively for brides either – they can also be for bridesmaids and flower girls too! For my wedding, I DIY’d my own veil and also a floral crown for my flower girl. I didn’t realize how ridiculously easy making either one would be until I actually started.

Veils:

When I was at David’s bridal, the veils I saw ranged anywhere from $30 all the way to $200+. It was ridiculous how expensive they were—and for what?! Essentially a piece of tulle! I was lucky that my mom worked in the textile industry her whole life so she was familiar with all the different textile shops in NY. I was also lucky that I lived in NY where tons of discounted/hole-in-the-wall textile shops were available. The shop I visited was a really sketchy looking shop and the inside of it was even sketchier looking. Bits and pieces of cloth, ribbons, zippers, etc. were hung/shoved into shelves/racks. It was the most disheveled looking store I had ever been to. I was very skeptical about whether I’d find what I needed, but my mom urged me to ask the storeowner if they had tulle. The lady thought about it for a few minutes and then ran and pulled out some tulle that was hiding behind other piles of cloth. She quoted us $5 for 3 yards of the tulle. I wasn’t quite sold. The tulle was wrinkled from being shoved behind other piles of cloth. My mom started inspecting the fabric and realized that there were a few runs and tears in the middle of the giant piece of tulle (had to have been over 10 yards of material), so we raised it to the shop owner. After acknowledging that, she offered us the whole piece of tulle for $5…so we went with it. I didn’t need the full piece for my veil since I’m on the shorter side, so since we got the full piece of tulle, there was plenty of room for trial and error and also to create my veil.

Our next stop was an accessories shop for costume makers. We needed a haircomb to sew the tulle onto. We probably could’ve gotten these for cheaper online somewhere, but for convenience, we just bought them on the spot – I mean, they were just $3.50 for one.

We didn’t need to buy thread/needle separately since they were already items that I had at home. As such, in total, I spent $8.50 on my veil…compared to the $30+ they usually retail for in stores!

Wednesday, June 1, 2016

Wedding Timeline


Pic: source

The first thing to do when it comes to planning a wedding is definitely putting together a timeline of what needs to get done and when they need to be done by. This gives you a highlevel summary of what you have on your plate, what/how you can delegate, etc.

There are tons of templates available as well as lists of things to do and the timing for each item. I've included a few examples below as well as links to the sources.

What I've found to be very helpful is to pick one to use as a base, but definitely go through each item and see if each one makes sense. Think about what you plan to have at your wedding and tailor the list so it caters to meet your needs.

As a rather visual/analytical excel lover, I've found that none of my planning/forecasting efforts ever go well without the involvement of a worksheet. Luckily for me, my bridesmaid found me the perfect spreadsheet to start with in the form of an excel. We've also added additional tabs after the max timeline tab to indicate our research on various vendors, etc.

Here is a list on some places where you can find pre-made wedding timelines:

Here comes the guide

Bridal Guide

Lauren Conrad

Tuesday, May 31, 2016

Venue: Greentree Country Club

Before we get into the post...I know, I know. What's with the long hiatus?! Isn't your two year journey over by now?!

Let's just say that life happened and distracted me from blogging.

And yes, my two year journey to sanity DID end already and I'm already approaching my 1 year wedding anniversary soon...but I think it's still worthwhile to document what I recall from the whole wedding planning process!

Now, back to the topic at hand....

The venue I ultimately settled on was Greentree Country Club.


Making the decision was a tough one and involved multiple spreadsheets laying out the pro’s and con’s as well as the cost differentials. Ultimately, I felt more comfortable with Greentree since their costs were much more transparent than the other venues I visited.

The Venue

Greentree Country Club is located in New Rochelle, NY, right off of the Long Island Sound. There are about 3-4 other potential wedding venues along the same road and for good reason -- the area there is beautiful!

There is an outdoor area right by the beach for outdoor ceremonies and 2 indoor reception halls. For cocktail hour, the location can vary based on which reception hall you get. If you book the larger hall (which requires a 250 pp minimum, you can have an outdoor cocktail hour right behind the ceremony space (very beautiful!) and if you book the smaller hall, then you can have the cocktail hour in the space that's right outside of the reception hall but overlooks the ceremony space/pools/beach. 

I booked the smaller hall since I wanted to keep my wedding relatively small. My wedding venue coordinator/planner was Harrison, who was great to work with. However, midway through, Harrison left Greentree for another job and I ended up getting someone named Anthony, who honestly, wasn't as great as Harrison in terms of responsiveness. Nonetheless, the whole coordination with the venue went pretty smoothly.

Here are some pictures I took during my first visit:


The Process

After deciding on the venue, we emailed the venue right away to secure our date as well as to schedule another in person meeting to discuss logistics and next steps. During the process of discussing the contract, Harrison even threw in a couple hours extra for our reception and also threw in three chocolate fountains for our dessert buffet. I have to say, the chocolate fountains and the dessert spread was fantastic. It was beyond what I expected and just looked so heavenly!