“Save the Date” cards are cards usually sent by the engaged
couple to the people they are planning to invite to their wedding. Wait, isn’t
that just the invitation? No – actually, “Save the Date’s” are usually meant to
be sent in advance of the invitation to give guests a heads up that the
invitation will be sent soon. Usually it’s a quick FYI just to let them know when the wedding is happening and who the individuals involved are.
Now…are they really that necessary? Depends on the size of
your wedding and how far away your wedding will be. For example, if you’re
planning to have a 2 year long engagement, then it might make sense to send out
“Save the Date’s” in advance so your guests will know well in advance and can
plan their schedules accordingly. If you’re having a really small wedding, you
don’t need to send out “Save the Date’s”—you could just let them know verbally.
If your engagement is short, then you totally don’t need this because just the
invitation itself should suffice. Really, who am I kidding? You never really need anything. “Save the Date’s” are
just nice gestures—not absolutely necessary. If you’re tight on budget, you
could just forgo this as well. Honestly, I don’t think anyone would really miss it.
For me, I had a long engagement, so I wanted to send out “Save
the Date’s” so my guests would know the date in advance---that and also because
I was handmaking all of my invitations and didn’t know when I would be getting
them done!
Now, “Save the Date’s” can come in many shapes and forms—feel
free to get creative with this. I know some people who’ve done video “Save the
Date’s” before, and some people who have done traditional postcards. For me, I
wanted to DIY my “Save the Date’s” to keep my costs low and also because I love
DIY’ing.
To start the process, I googled and looked on Pinterest for “Save
the Date” designs that I liked. Then, I narrowed the selection down to ones
that would be easy to make…and then to ones that would be easy to make based on
the tools and materials that I would be able to obtain. This last filter made
it easy because most of the designs I liked involved color…and I only had a
B&W printer. The design I saw was this:

PIC: Source
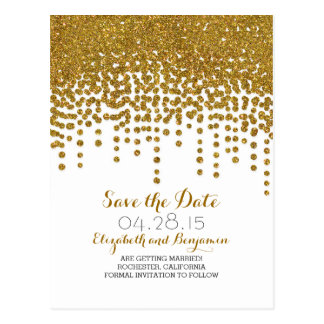
The design was simple – just find some cream colored stock
paper, print out the message, and then go to town with some glitter. Simple enough,
right?
This process actually took quite a bit of trial and error.
Turns out creating a glitter gradient isn’t as simple as it sounds. This was my
finished product:

Now before you start asking questions -- yes, the glitter WILL shed a bit and some of my friends did complain to me that they were not prepared for the glitter (and why not?!). I was actually just experimenting. You know that new online company where you can pay them to send glitter bombs to your enemy? Yeah, this was the prototype. No, I kid. I just love gold glitter. :)
Materials:
- Stock cards
- Printer (for printing the cards)
- Glitter (the one I used was in "copper")
- Spray on adhesive
- Spray on Sealant
- Envelopes
- Corner puncher (optional)
Assembly:
- The first step is to figure out the message you want on your card. The standard message really just includes the name of the couple, the date, and the geographic location of where the wedding will take place…oh and yes, something along the lines of “Save the Date” and “Formal Invitation to Follow”.
- Once you have the message thought out, the next step is to decide on the fonts and text arrangement on your “Save the Date”. For this step, Adobe Photoshop is quite handy…as are font websites like dafont.com. Play around with different fonts and font sizes. You don’t need to stick with just one font type! This was my starting template:

- Once you have the layout, make sure that whatever you’ve created will fit within the parameters of the card stock that you’re using. I would suggest using 1 to test print to make sure everything is working as intended.
- This next part is optional, but I wanted my “Save the Dates” to have round corners, so I used a corner puncher to punch out all the corners.
- To create the glitter gradient, first lay some large sheets of paper on your work surface. I would suggest working outdoors since you’ll be using spray adhesive and sealant, but wind and glitter aren’t a very good combination…so just choose a well ventilated indoor area and use some cardboard boxes to create a fort around the work area so your adhesive and sealant doesn’t get everywhere.
- Once you have your workstation set up, take the adhesive and spray the card from about a foot away—you don’t really need to spray the whole card—just focus on the top 2/3 of the card. Once the adhesive is on, sprinkle on the glitter in layers (not sections!). You want to make sure you sprinkle the glitter on lightly and then just build your way up to create the gradient effect.
- Once you’re done with the glitter, let it dry for a bit before sealing the adhesive and the glitter with your spray on sealant. Note – I used a laser printer and the ink from the printer didn’t print very well on the card stock I used –basically the ink would easily rub off from the card. As such, using the sealant also helped to seal in the text for me.
- The last part is to put them into envelopes and seal them. For me, I chose a postcard size for my “Save the Dates” so I wanted to find envelopes that fit my “Save the Dates” easily from Michaels. I also used 40% off coupons and had 2 of my bridesmaids help me purchase the envelopes so I got about 100 envelopes for pretty cheap – that’s actually a tip for anyone who’s planning to DIY their wedding – sign up for Michael’s email list and they’ll send you a 40% off coupon almost EVERY week. Then just bring a bunch of people to Michael’s with you to buy whatever it is that you need.
Google how to do “mail merges”
using Microsoft word and excel. This really helps save time when printing
envelopes. For those who have never heard of “mail merge” – this is basically a
function that helps automate the process of pulling names and addresses to
letters/envelopes. Here is the official Microsoft webpage explaining how to do
a mail merge. Once you get the mail merge set up, all you need to do is run it and it'll populate a word document with the dimensions of your envelopes and have all the addresses pulled in for you so that all there is for you do is simply load your envelopes into your printer and then press "print"! Seriously a life saver!
Hope this was helpful! Now go forth and conquer!
No comments:
Post a Comment